The installation process for a remote control toilet seat is a crucial topic for both homeowners and businesses looking to upgrade their bathroom facilities. As a supplier of high - quality remote control toilet seats, I am here to guide you through the step - by - step installation process.
Preparation
Before you start the installation, it is essential to gather all the necessary tools and materials. You will typically need a screwdriver (both flat - head and Phillips - head), an adjustable wrench, a level, and a measuring tape. Additionally, make sure you have the remote control toilet seat itself, which comes with a user manual, mounting hardware, and a water supply line.
First, turn off the water supply to the existing toilet. Locate the shut - off valve usually located on the wall behind the toilet and turn it clockwise until the water flow stops. Flush the toilet to drain the remaining water from the tank and bowl. You can use a sponge or a towel to soak up any excess water.
Removing the Old Toilet Seat
Use a screwdriver to remove the bolts that secure the old toilet seat to the toilet bowl. These bolts are usually located at the back of the seat. In some cases, the bolts may be covered with plastic caps. If so, gently pry off the caps with a flat - head screwdriver. Once the bolts are removed, lift the old toilet seat off the bowl and set it aside.
Cleaning the Toilet Bowl
After removing the old seat, take the time to clean the toilet bowl thoroughly. Use a toilet cleaner and a brush to scrub the area where the new seat will be installed. Make sure to remove any dirt, grime, or residue. This will ensure a proper and secure fit for the new remote control toilet seat.
Checking the Toilet Bowl Dimensions
Before installing the new seat, measure the distance between the bolt holes on the toilet bowl. Most remote control toilet seats are designed to fit standard toilet bowls, but it's still important to double - check. Our Multi - functional Remote Control Toilet Seat is available in various sizes to accommodate different toilet bowl dimensions. If you have a non - standard toilet bowl, it's recommended to contact our customer service for assistance.
Installing the Mounting Hardware
Take the mounting hardware that came with the remote control toilet seat. Place the mounting brackets on the toilet bowl, aligning them with the bolt holes. Insert the bolts through the brackets and the holes in the toilet bowl. Tighten the bolts using a screwdriver, but be careful not to overtighten as this may crack the toilet bowl. Use a level to ensure that the mounting brackets are perfectly horizontal.
Connecting the Water Supply
The remote control toilet seat requires a water supply to function properly. Locate the water inlet on the back of the seat. Connect one end of the water supply line to the water inlet and the other end to the shut - off valve. Use an adjustable wrench to tighten the connections securely. Once the connections are made, turn on the water supply by turning the shut - off valve counterclockwise. Check for any leaks around the connections. If you notice any leaks, tighten the connections further or use a plumbing tape to seal them.
Attaching the Toilet Seat
Carefully place the remote control toilet seat on the mounting brackets. Align the holes in the seat with the bolts on the brackets. Insert the nuts onto the bolts and tighten them using a screwdriver. Make sure the seat is firmly attached to the brackets and does not wobble.


Testing the Seat
Once the seat is installed, it's time to test its functionality. Press the buttons on the remote control to check the various features such as the bidet function, seat heating, and air drying. If you encounter any issues during the testing process, refer to the user manual or contact our technical support team.
Additional Considerations
Some remote control toilet seats, like our U Shape Remote Control Toilet Seat, are designed with a U - shape for enhanced comfort. When installing a U - shape seat, make sure it is properly aligned with the toilet bowl to ensure a comfortable sitting position.
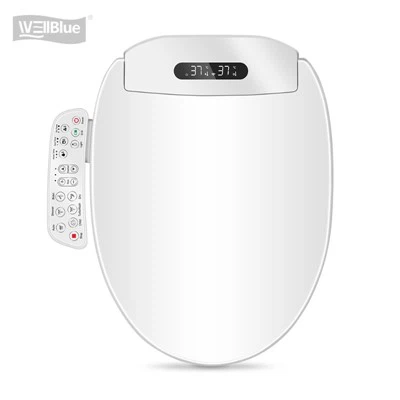
Our Black Panel Remote Control Toilet Seat features a sleek and modern black panel design. During the installation, take extra care when handling the seat to avoid scratching the panel.
Troubleshooting
If the remote control does not work, check the batteries. Replace the batteries with new ones if necessary. Make sure the seat is properly connected to the power source. If the water pressure is low, check the water supply line for any kinks or blockages. If the issue persists, contact our technical support for further assistance.
Conclusion
Installing a remote control toilet seat is a relatively straightforward process that can significantly enhance the comfort and functionality of your bathroom. By following the steps outlined above, you can install the seat safely and efficiently. If you have any questions or need further guidance during the installation process, our team of experts is always ready to help.
We take pride in offering high - quality remote control toilet seats with a wide range of features and designs. Whether you are a homeowner looking to upgrade your bathroom or a business owner in need of commercial - grade toilet seats, we have the perfect solution for you.
If you are interested in purchasing our remote control toilet seats or have any questions about the installation process, please feel free to reach out to us. We look forward to discussing your needs and helping you find the ideal remote control toilet seat for your requirements.
References
- Manufacturer's user manual for remote control toilet seats.
- Plumbing installation guides.